Small Bathroom Remodel on a Budget: DIY Updates Under $1,000
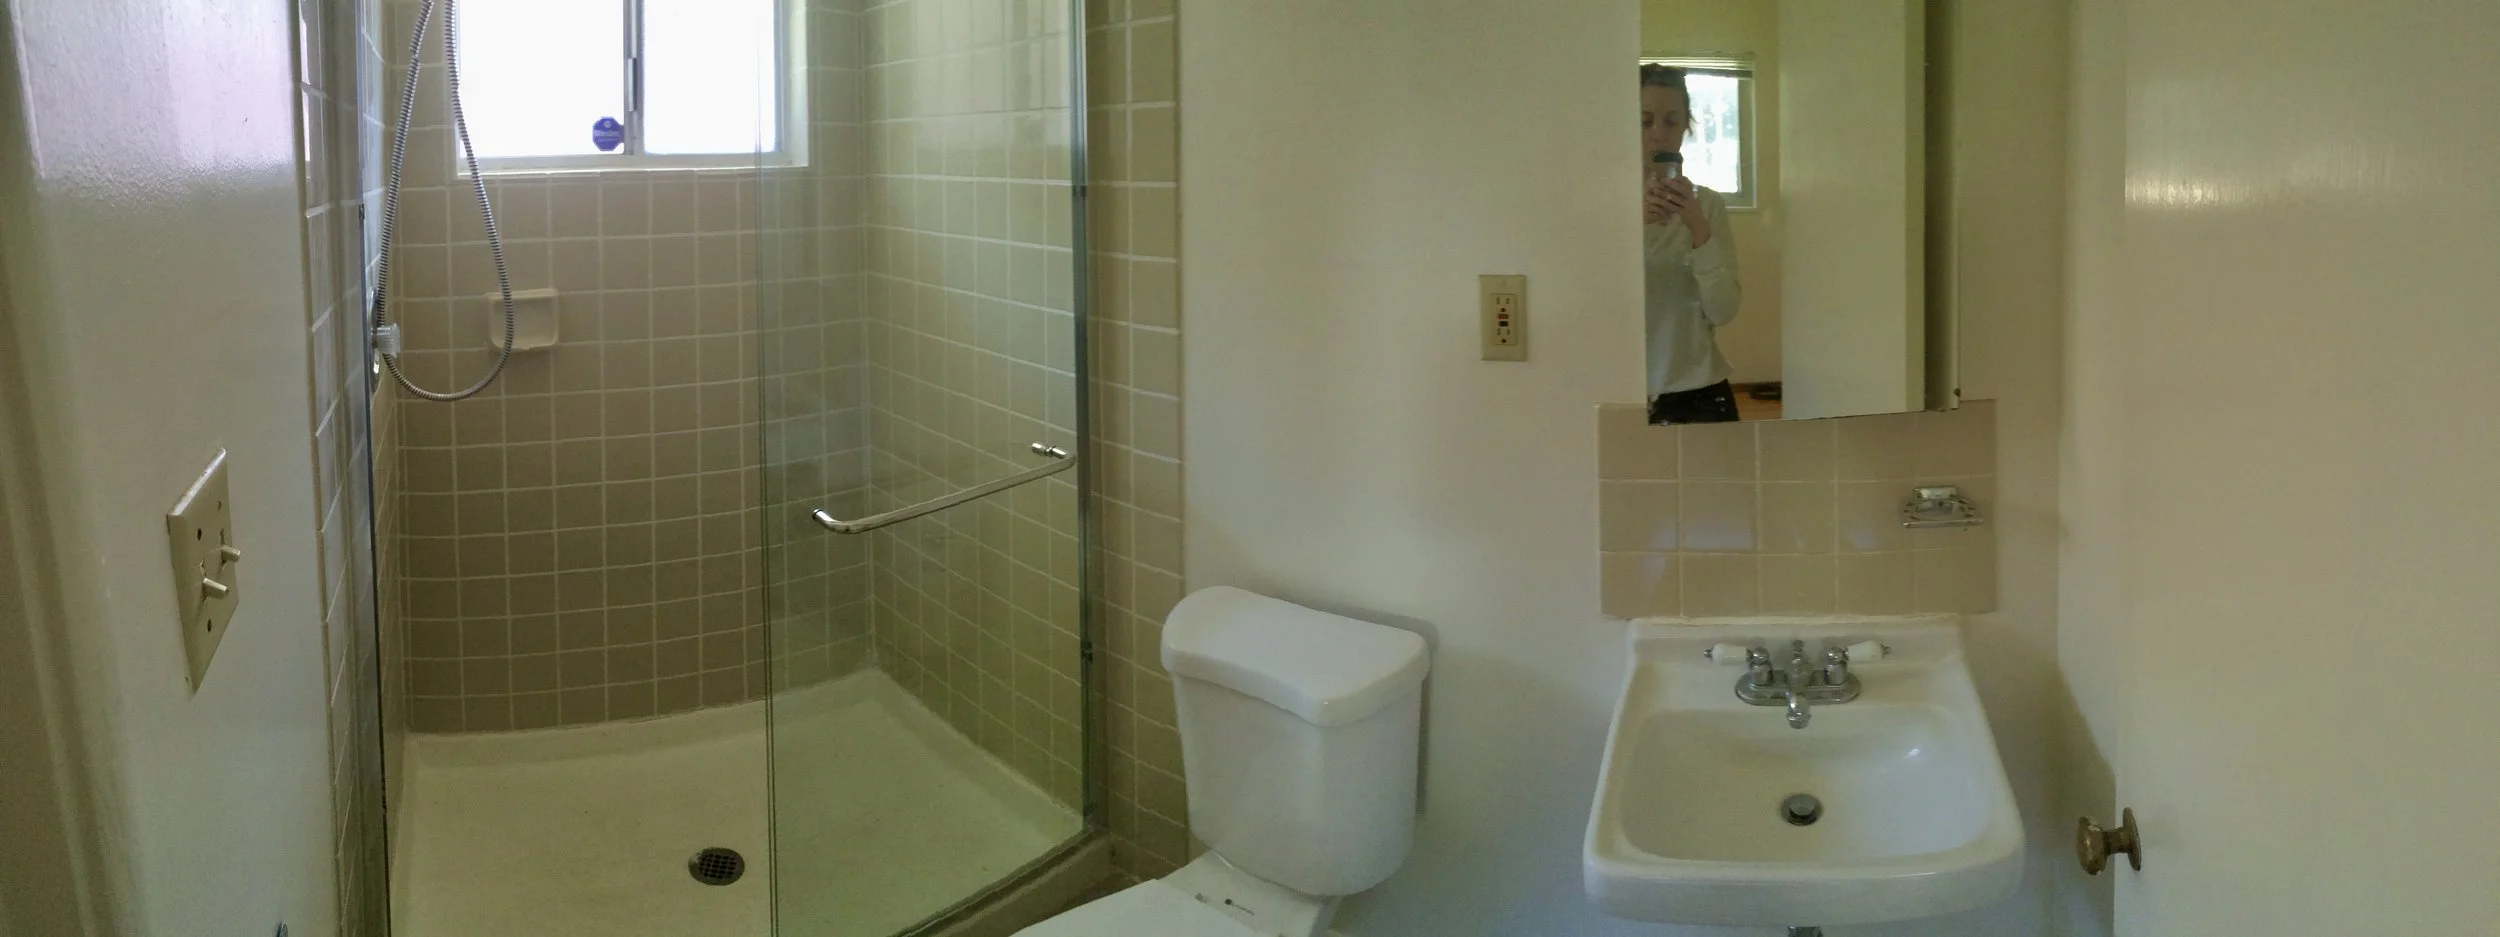
The Bathroom “Before” giving... prison vibes
I’m a big believer in doing my best to start the day on a good note, and this bathroom made that nearly impossible. Did we dream of a stunning, spa-worthy primary bath? Absolutely. Could we afford a full renovation right after buying a house (and juggling a million other projects)? Not a chance. And waiting forever to save up? Felt like it would make us resent our home.
So we opted for a small bathroom reno on a budget, a few affordable bathroom updates that would make a big difference without breaking the bank. Maybe a new vanity isn’t possible yet, but painting the shower tile, swapping a light fixture, or adding fresh towels can completely refresh the space. Small, thoughtful changes are still a win. You don’t need a full renovation to make your bathroom feel better today, do what you can now, and save the big projects for later. Do what works for you, not everyone else.
The Budget and Goals
When we were house shopping, we realized fast that our pre-approval from the bank did not leave much wiggle room for renovations, and nearly every house we saw needed work. Instead of maxing out, we decided to lower our budget on the house itself. That freed up more of our budget for actual renovations. Our realtor hated this idea (and did not hide it well). Not sorry Sheila.
The reality was that most of our renovation budget was earmarked for new windows, the kitchen, and a load bearing wall situation. That left very little for the bathroom. But the bathroom was so depressing that we could not just leave it alone. It was honestly one of the saddest bathrooms I have ever had (yet most expensive), and yes, I say that from a place of privilege, but still.
We were not ready or able to do a full gut job yet, so we landed on a medium renovation. It was more than just a coat of paint, but less than a total remodel. Think of it as a budget bathroom refresh: fixing what we could, swapping out what made sense, and trying to make the space functional.
We set a hard cap of $1,000 or less, which meant focusing on high-impact, low-cost changes.
The Updates We Made
When you DIY, things take longer, and that’s ok. The upside is you can usually still use the room while you work. We weren’t about to blow the budget moving walls, so I broke the project into sections: shower, floor, vanity. That way, we could tackle one thing at a time instead of losing the whole bathroom for weeks. I started with the tile behind the sink (couldn’t stand looking at it for one more day), and since it didn’t impact actually using the bathroom, it was the perfect first project. The trick to surviving a DIY reno? Clean up as you go. Sure, it was a little chaotic, but at least I could still wash my face and put on makeup without tripping over tools.


Paint and Walls
One of the cheapest, highest-impact changes in any bathroom is paint, but you have to use the right kind. Bathrooms get steamy, and if you do not choose a paint formulated for humidity, you will be dealing with peeling walls and mildew before long. We used Sherwin-Williams Duration Home® for moisture resistance
I wanted to see how much brighter we could make the bathroom, so I went with white. It definitely helped bounce light around in the space and made it feel a little less dungeon-like. But here is the honest truth: I got sick of the all-white bathroom pretty quickly. At the time, I was not in the headspace to put together a fun color palette. I just needed the room to feel clean and livable. Looking back, I would say go white if you need a blank slate, but do not be afraid to commit to a little color when you are ready.
Update Bathroom Tile Without Replacing
I was nervous to try painting bathroom tile, but I went for it for a low cost shower remodel, and I’m glad I did. It held up much better than I expected. I used the Rust-Oleum Tub & Tile Refinishing Kit in White, which at the time (2016) was only sold online. I paid $23.27 per kit and ended up needing two to cover our small shower. Fast forward to 2025, and those same kits now sell for around $45.80 each. That’s almost double the price, thanks to a mix of rising raw material costs, supply chain disruptions, and steady demand for affordable DIY renovation products (the overall price of home improvement materials has increased nearly 40% since 2020).
The product itself is no joke, you’ll need a mask and plenty of ventilation because the fumes are intense. At first, the formula went on a little runny, but once I got the hang of the application, it evened out and started looking surprisingly good. It’s not a forever solution, but if you want to refresh your shower tile on a budget, this is one of the best quick fixes.


Bathroom Lighting and Mirror Upgrade
The old mirror had to go. We replaced it with a larger, cleaner design that reflected more light and instantly made our small bathroom feel bigger. A mirror upgrade is one of the easiest ways to brighten a space without a huge budget. We also swapped out the light fixture, which is a simple project that makes a big impact. I tried a fully integrated LED light for the first time, and I don’t recommend it. Once the bulb burns out, the entire fixture has to be replaced. Not exactly eco-friendly (or cost-effective). Luckily, I didn’t love the design anyway, so it wasn’t a huge loss.
Bathroom Storage Solutions
Even in a minimalist home, bathroom storage matters. We added a cabinet above the toilet and went with a small vanity, which gave us at least a little extra space. But for two adults, it’s still not nearly enough. If you’re working with a small primary bath, consider creative storage ideas like wall-mounted shelves, baskets, or recessed niches. Even small upgrades can make a bathroom more functional day to day.


The Big Purchase in Our DIY Bathroom Makeover
The first big change was swapping out the tiny wall-mounted sink for a functional budget-friendly bathroom vanity. Ikea has great options for small spaces, and since our bathroom door opened inward, a standard vanity wasn’t an option. A pocket door would have solved the problem, but thanks to a load-bearing post, that dream had to wait for a future remodel.
What Worked (and What Didn’t)
The vanity upgrade and painted shower tiles made the biggest impact. These two changes completely transformed the bathroom from dark and dated beige into something clean, functional and livable.
The floor tile replacement was our biggest regret. For a temporary bathroom refresh, it simply wasn’t worth the cost or the mess. If you’re planning a full renovation later, save your money. Today, peel-and-stick flooring for bathrooms can be a smart budget-friendly alternative, but when we tackled this project, that wasn’t widely available.


Cost Breakdown
Here is a rough breakdown of what we spent:
Paint and supplies: ~$100
Sink and vanity: ~$350
Fixtures and hardware: ~$100
Lighting and mirror: ~$100
Flooring: ~$250 (the regret line item)
Total: ~900
This budget bathroom makeover was not perfect, but it made a huge difference. At the time, I did not have a clear vision for the style of the house, and as embarrassing as this light renovation looks to me now, it was perfectly fine for what we needed then. I was confident in my skills to renovate but had not yet found my groove for decorating, and that is ok. Everyone has a few “cringe” before-and-after photos in their past, right? Small, affordable updates can completely change how a bathroom feels, even if you are saving the big renovation for later.
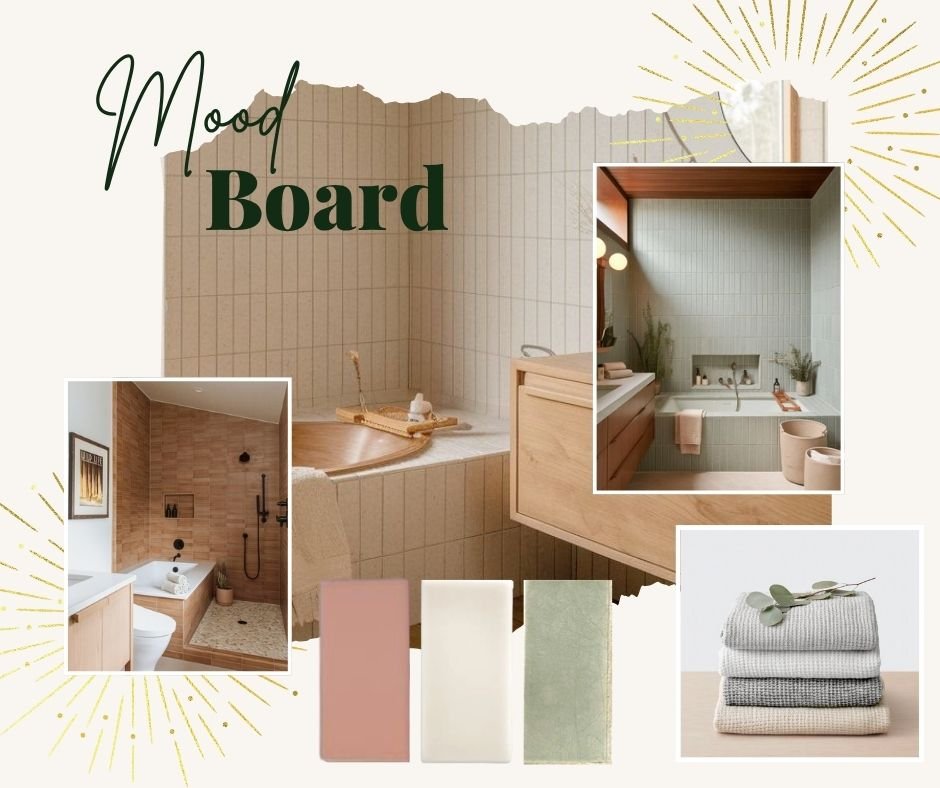
A few years later we went from “Make It Tolerable” to Total Transformation
We wanted a desert-inspired refresh that feels warm, simple, and peaceful. Proof that even small spaces can feel like spa days. Subscribe below for the full reveal, and follow on Instagram for all the before-and-afters and real small-space ideas you can actually use.