How to Restore a Vintage Nelson Bubble Lamp
There’s something deeply satisfying about rescuing a design classic. When I saw someone giving away a dirty, broken Nelson Bubble Lamp on my local Buy Nothing group, I knew it had potential—even if it looked like it had seen better decades.

These lamps are not cheap. A new one from Herman Miller will run you anywhere from $595 to over $1,000, depending on the size and style. So finding one for free? A dream. But it needed work. Dirty, discolored, and with a non-functioning socket, this lamp could easily have ended up in the trash. Most people would’ve tossed it.
But we throw away too many beautiful things just because they need a little care.
Why We Need to Care for What We Already Own
This project isn’t just about scoring a fancy light for free. It’s about rethinking how we treat our belongings. So many things get discarded not because they’re broken beyond repair, but because no one bothered to try.
The truth is: most objects just need a little attention. A light cleaning. A small repair. A bit of patience. This Nelson Bubble Lamp was dirty, yes—but not damaged. With about an hour of gentle cleaning and a $15 rewiring kit, I brought it back to life. And it looks incredible.
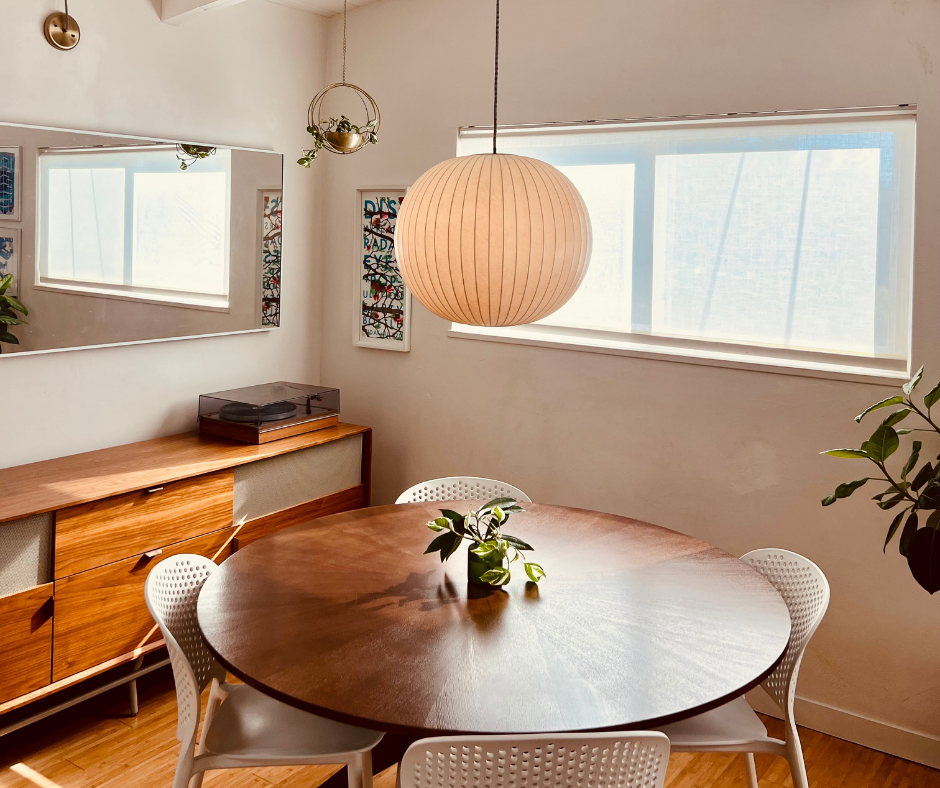
What Is a Nelson Bubble Lamp?
Designed by George Nelson in 1952, the Nelson Bubble Lamp series is an icon of mid-century modern design. Their soft glow and sculptural shapes have become synonymous with clean, minimalist interiors. They're made with a steel frame wrapped in a translucent polymer, which gives them their signature diffuse light.
They’re also notoriously hard to clean. But not impossible.
How to Clean a Nelson Bubble Lamp
Before you grab any heavy-duty cleaners or scrub brushes—don’t. These lamps are delicate, and harsh scrubbing will do more harm than good.
What You Need:
A dry microfiber cloth
A second microfiber cloth lightly dampened with warm water
Possibly a very soft toothbrush (don’t press hard when using it)
Mild dish soap (optional, for stubborn spots)
A ladder or step stool (depending on where it’s hung)
Step-by-Step:
Dust first. Use the dry microfiber cloth to remove any loose debris. Always go gently.
Dampen a second cloth with warm water. If needed, add a drop of mild soap.
Wipe gently. Focus on small sections, and don’t saturate the material. You’ll likely see results after just a few careful passes.
Let air dry. Don’t rub with a towel—just let it sit.


How to Rewire a Nelson Bubble Lamp
If your lamp doesn’t work, chances are it just needs new wiring. This sounds intimidating, but it’s surprisingly simple.
What You Need:
A basic plug-in lamp kit ($10–$15 at most hardware stores)
A small flathead screwdriver
Electrical tape or wire nuts
Optional: a friend who knows basic wiring for backup
Step-by-Step:
Unplug everything. Safety first.
Remove the old socket by gently unscrewing it. Make note of how it’s wired (take a pic).
Thread in the new cord through the base or opening.
Connect the wires. Usually, black to black (hot), white to white (neutral). Twist wires together and cap with wire nuts or tape.
Secure the socket and test the lamp before reinstalling.
You can always consult a professional if you’re unsure—but for many DIYers, this is a totally doable weekend project.


This Nelson Bubble Lamp was free. It could’ve been trash. But instead, it’s a glowing reminder that:
Thoughtful design lasts.
A little effort goes a long way.
We don’t need to buy new to live beautifully.
So next time something looks a little too far gone…Give it a wipe. Give it a second chance. You might be surprised at what you uncover.